
問題描述:
兩個樓宇共用一個防火牆接入網絡,分別使用兩家不同的運營商,應該怎麼配置?求助,謝謝!
組網及組網描述:
運營商光貓-防火牆-核心交換機
- 2025-03-13提問
- 舉報
-
(0)
最佳答案

可以的,看具體需求了。
可以同時跑流量,也可以做主備
也可以負載均衡,參考下案例:
1.18.1 出方向鏈路負載均衡基本組網配置舉例
1. 組網需求
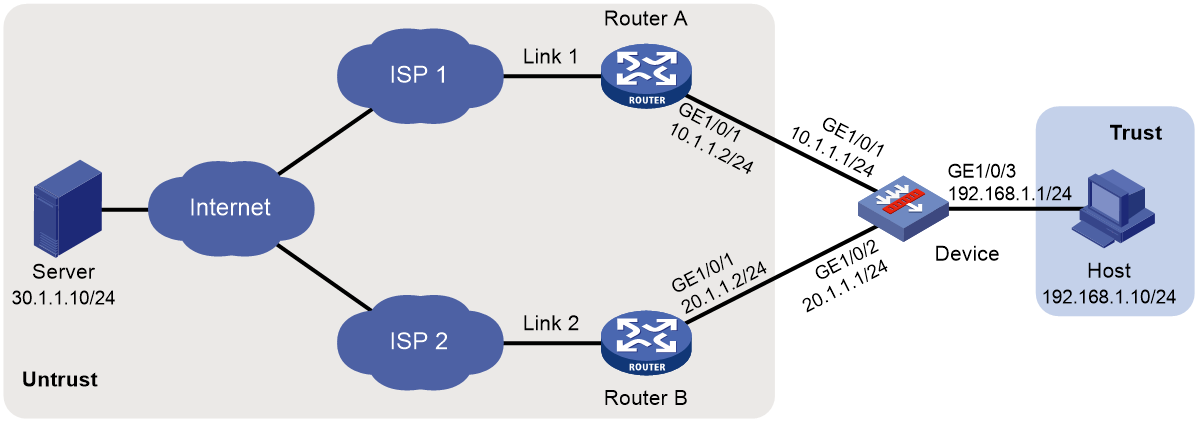
用戶從兩個運營商ISP 1和ISP 2處分別租用了鏈路Link 1和Link 2,這兩條鏈路的路由器跳數、帶寬和成本均相同,但Link 1的網絡延遲小於Link 2。通過配置鏈路負載均衡,使Host訪問Server時優先選擇這兩條鏈路中的最優鏈路。
2. 組網圖
圖1-4 出方向鏈路負載均衡基本組網配置組網圖
3. 配置步驟
(3) 配置接口IP地址
# 根據組網圖中規劃的信息,配置各接口的IP地址,具體配置步驟如下。
<Device> system-view
[Device] interface gigabitethernet 1/0/1
[Device-GigabitEthernet1/0/1] ip address 10.1.1.1 255.255.255.0
[Device-GigabitEthernet1/0/1] quit
請參考以上步驟配置其他接口的IP地址,具體配置步驟略。
(4) 配置接口加入安全域。
# 請根據組網圖中規劃的信息,將接口加入對應的安全域,具體配置步驟如下。
[Device] security-zone name untrust
[Device-security-zone-Untrust] import interface gigabitethernet 1/0/1
[Device-security-zone-Untrust] import interface gigabitethernet 1/0/2
[Device-security-zone-Untrust] quit
[Device] security-zone name trust
[Device-security-zone-Trust] import interface gigabitethernet 1/0/3
[Device-security-zone-Trust] quit
(5) 配置安全策略
配置安全策略放行Trust與Untrust安全域、Local與Untrust安全域之間的流量,用於用戶訪問外網服務器。
# 配置名稱為lbrule1的安全策略規則,使用戶可以訪問外網服務器,具體配置步驟如下。
[Device] security-policy ip
[Device-security-policy-ip] rule name lbrule1
[Device-security-policy-ip-1-lbrule1] source-zone trust
[Device-security-policy-ip-1-lbrule1] destination-zone untrust
[Device-security-policy-ip-1-lbrule1] source-ip-subnet 192.168.1.0 255.255.255.0
[Device-security-policy-ip-1-lbrule1] action pass
[Device-security-policy-ip-1-lbrule1] quit
# 配置名稱為lblocalout的安全策略規則,使Device可以向鏈路下一跳發送健康檢測報文,具體配置步驟如下。
[Device-security-policy-ip] rule name lblocalout
[Device-security-policy-ip-2-lblocalout] source-zone local
[Device-security-policy-ip-2-lblocalout] destination-zone untrust
[Device-security-policy-ip-2-lblocalout] destination-ip-subnet 10.1.1.0 255.255.255.0
[Device-security-policy-ip-2-lblocalout] destination-ip-subnet 20.1.1.0 255.255.255.0
[Device-security-policy-ip-2-lblocalout] action pass
[Device-security-policy-ip-2-lblocalout] quit
[Device-security-policy-ip] quit
(6) 配置鏈路組
# 創建ICMP類型的NQA模板t1,並配置每次探測結果發送機製。
[Device] nqa template icmp t1
[Device-nqatplt-icmp-t1] reaction trigger per-probe
[Device-nqatplt-icmp-t1] quit
# 指定缺省就近性探測方法為t1,並配置就近性計算的網絡延遲權值為200。
[Device] loadbalance proximity
[Device-lb-proximity] match default probe t1
[Device-lb-proximity] rtt weight 200
[Device-lb-proximity] quit
# 創建鏈路組lg,開啟就近性功能,關閉NAT功能。
[Device] loadbalance link-group lg
[Device-lb-lgroup-lg] proximity enable
[Device-lb-lgroup-lg] transparent enable
[Device-lb-lgroup-lg] quit
(7) 配置鏈路
# 創建鏈路link1和link2,配置link1的下一跳IPv4地址為10.1.1.2,link2的下一跳IPv4地址為20.1.1.2,加入鏈路組lg。
[Device] loadbalance link link1
[Device-lb-link-link1] router ip 10.1.1.2
[Device-lb-link-link1] link-group lg
[Device-lb-link-link1] quit
[Device] loadbalance link link2
[Device-lb-link-link2] router ip 20.1.1.2
[Device-lb-link-link2] link-group lg
[Device-lb-link-link2] quit
(8) 配置虛服務器
# 創建LINK-IP類型的虛服務器vs,配置其VSIP為通配0.0.0.0/0,指定其缺省主用鏈路組為lg,並開啟此虛服務器。
[Device] virtual-server vs type link-ip
[Device-vs-link-ip-vs] virtual ip address 0.0.0.0 0
[Device-vs-link-ip-vs] default link-group lg
[Device-vs-link-ip-vs] service enable
[Device-vs-link-ip-vs] quit
- 2025-03-13回答
- 評論(0)
- 舉報
-
(0)

對於兩個樓宇共用一個防火牆接入網絡,分別使用兩家不同運營商的情況,可以按照以下步驟進行配置:
1. **防火牆主備配置**:使用RBM(Redundant Border Module)技術配置兩台防火牆,確保在一台防火牆出現故障時,另一台可以立即接管,實現高可用性。
2. **ISP鏈路配置**:每個ISP提供一個公網IP,防火牆的上行接口可以配置為同網段的私網IP地址,將VRRP虛擬地址設置為ISP提供的公網IP地址。確保配置虛擬IP時使用正確的子網掩碼。
3. **故障快速感知**:配置防火牆的路由協議,如OSPF或BGP,以便在運營商接入交換機上行鏈路出現故障時,防火牆能夠快速感知並切換到另一條可用的ISP鏈路。
4. **內網核心交換機配置**:內網核心交換機使用IRF(Intelligent Resilient Framework)技術實現高可靠性,確保數據流的穩定傳輸。
5. **SNAT配置**:為了使內網vlan 100(172.16.100.0/24)能夠訪問運營商網絡,需要在防火牆上配置SNAT(Source Network Address Translation),確保源地址轉換正確。
6. **安全策略配置**:將防火牆各接口加入適當的安全域,並配置安全策略,允許必要的流量通過,例如放行TCP 2222端口用於SSH服務。
7. **接口管理**:根據網絡需求配置接口,包括以太網接口、子接口、Loopback接口和Null接口,確保網絡的連通性和安全性。
通過以上配置,可以實現兩個樓宇共用防火牆接入網絡,同時利用兩家不同運營商的鏈路,提高網絡的可靠性和性能。
- 2025-03-13回答
- 評論(0)
- 舉報
-
(0)
暫無評論
CLI方式:Context基本組網典型配置
使用版本
本舉例是在F1090的R8660P33版本上進行配置和驗證的。
組網需求
如下圖所示,將設備Device虛擬成三台獨立的Device:Context cnt1、Context cnt2、Context cnt3,並分給三個不同的用戶網絡進行安全防護。要求在用戶側看來,各自的接入設備是獨享的。
· LAN 1、LAN 2、LAN 3分別屬於公司A、公司B、公司C,現各公司的網絡均需要進行安全防護。公司A使用的網段為192.168.1.0/24,公司B使用的網段為192.168.2.0/24,公司C使用的網段為192.168.3.0/24。
· 公司A的用戶多,業務需求複雜,因此需要給Context cnt1提供較大的內存空間使用上限,以便保存配置文件、啟動文件和係統信息等;對公司B使用係統缺省的內存空間即可;公司C人員規模小,上網流量比較少,對接入Device的配置及性能要求較低,因此對Context cnt3提供較低的CPU權重。
· GigabitEthernet1/0/1和GigabitEthernet1/0/4分配給Context cnt1、GigabitEthernet1/0/2和GigabitEthernet1/0/5分配給Context cnt2、GigabitEthernet1/0/3和GigabitEthernet1/0/6分配給Context cnt3。
圖-1 Context基本組網配置組網圖
/images/m230712x1z12/x_Img_x_png_0.png)
配置步驟
創建並配置Context cnt1,供公司A使用
# 創建Context cnt1,設置描述信息。
<Device> system-view
[Device] context cnt1
[Device-context-2-cnt1] description context-1
# 配置Context cnt1的內存使用上限均為60%、CPU權重為8,具體配置步驟如下。
[Device-context-2-cnt1] limit-resource memory slot 1 cpu 0 ratio 60
[Device-context-2-cnt1] limit-resource cpu weight 8
# 將接口GigabitEthernet1/0/1和GigabitEthernet1/0/4分配給Context cnt1。
[Device-context-2-cnt1] allocate interface gigabitethernet 1/0/1 gigabitethernet 1/0/4
Configuration of the interfaces will be lost. Continue? [Y/N]:y
# 啟動Context cnt1。
[Device-context-2-cnt1] context start
It will take some time to start the context...
Context started successfully.
[Device-context-2-cnt1] quit
# 切換到Context cnt1。
[Device] switchto context cnt1
******************************************************************************
* Copyright (c) 2004-2021 New H3C Technologies Co., Ltd. All rights reserved.*
* Without the owner's prior written consent, *
* no decompiling or reverse-engineering shall be allowed. *
******************************************************************************
<H3C> system-view
# 配置Telnet功能,保證管理用戶可以正常登錄設備,具體配置步驟請參考“基礎配置指導”中的“登錄設備”。
# 將Context cnt1的名稱修改為cnt1,以便和其它Context區別。
[H3C] sysname cnt1
# 配置接口GigabitEthernet1/0/1的IP地址為192.168.1.251,供公司A的管理用戶遠程登錄。
[cnt1] interface gigabitethernet 1/0/1
[cnt1-GigabitEthernet1/0/1] ip address 192.168.1.251 24
# 從自定義Context cnt1返回缺省Context。
[cnt1-GigabitEthernet1/0/1] return
<cnt1> quit
[Device]
創建並配置Context cnt2,供公司B使用
# 創建Context cnt2,設置描述信息
[Device] context cnt2
[Device-context-3-cnt2] description context-2
# 將接口GigabitEthernet1/0/2和GigabitEthernet1/0/5分配給Context cnt2。
[Device-context-3-cnt2] allocate interface gigabitethernet 1/0/2 gigabitethernet 1/0/5
Configuration of the interfaces will be lost. Continue? [Y/N]:y
# 啟動Context cnt2。
[Device-context-3-cnt2] context start
It will take some time to start the context...
Context started successfully.
[Device-context-3-cnt2] quit
# 切換到Context cnt2。
[Device] switchto context cnt2
******************************************************************************
* Copyright (c) 2004-2021 New H3C Technologies Co., Ltd. All rights reserved.*
* Without the owner's prior written consent, *
* no decompiling or reverse-engineering shall be allowed. *
******************************************************************************
<H3C> system-view
# 配置Telnet功能,保證管理用戶可以正常登錄設備,具體配置步驟請參考“基礎配置指導”中的“登錄設備”。
# 將Context cnt2的名稱修改為cnt2,以便和其它Context區別。
[H3C] sysname cnt2
# 配置接口GigabitEthernet1/0/2的IP地址為192.168.2.251,供公司B的管理用戶遠程登錄。
[cnt2] interface gigabitethernet 1/0/2
[cnt2-GigabitEthernet1/0/2] ip address 192.168.2.251 24
# 從自定義Context cnt2返回缺省Context。
[cnt2-GigabitEthernet1/0/2] return
<cnt2> quit
[Device]
創建並配置Context cnt3,供公司C使用
# 創建Context cnt3,設置描述信息
[Device] context cnt3
[Device-context-4-cnt3] description context-3
#配置Context cnt3的CPU權重為2。
[Device-context-4-cnt3] limit-resource cpu weight 2
# 將接口GigabitEthernet1/0/3和GigabitEthernet1/0/6分配給Context cnt3。
[Device-context-4-cnt3] allocate interface gigabitethernet 1/0/3 gigabitethernet 1/0/6
Configuration of the interfaces will be lost. Continue? [Y/N]:y
# 啟動Context cnt3。
[Device-context-4-cnt3] context start
It will take some time to start the context...
Context started successfully.
[Device-context-4-cnt3] quit
# 切換到Context cnt3。
[Device] switchto context cnt3
******************************************************************************
* Copyright (c) 2004-2021 New H3C Technologies Co., Ltd. All rights reserved.*
* Without the owner's prior written consent, *
* no decompiling or reverse-engineering shall be allowed. *
******************************************************************************
<H3C> system-view
# 配置Telnet功能,保證管理用戶可以正常登錄設備,具體配置步驟請參考“基礎配置指導”中的“登錄設備”。
# 將Context cnt3的名稱修改為cnt3,以便和其它Context區別。
[H3C] sysname cnt3
# 配置接口GigabitEthernet1/0/3的IP地址為192.168.3.251,供公司C的管理用戶遠程登錄。
[cnt3] interface gigabitethernet 1/0/3
[cnt3-GigabitEthernet1/0/3] ip address 192.168.3.251 24
# 從自定義Context cnt3返回缺省Context。
[cnt3-GigabitEthernet1/0/3] return
<cnt3> quit
[Device]
驗證配置
查看Context是否存在並且運轉正常。(此時,Device上應該有四台處於正常工作active狀態的Context)
[Device] display context
ID Name Status Description
1 Admin active DefaultContext
2 cnt1 active context-1
3 cnt2 active context-2
4 cnt3 active context-3
模擬公司A的管理用戶登錄到Context cnt1,可以查看本設備的當前配置。
C:\> telnet 192.168.1.251
******************************************************************************
* Copyright (c) 2004-2021 New H3C Technologies Co., Ltd. All rights reserved.*
* Without the owner's prior written consent, *
* no decompiling or reverse-engineering shall be allowed. *
******************************************************************************
<cnt1> display current-configuration
……
配置文件
#
context cnt1
description context-1
context start
limit-resource memory slot 1 cpu 0 ratio 60
limit-resource cpu weight 8
allocate interface GigabitEthernet1/0/1
allocate interface GigabitEthernet1/0/4
#
context cnt2
description context-2
context start
allocate interface GigabitEthernet1/0/2
allocate interface GigabitEthernet1/0/5
#
context cnt3
description context-3
context start
limit-resource cpu weight 2
allocate interface GigabitEthernet1/0/3
allocate interface GigabitEthernet1/0/6
#
switchto context cnt1
#
sysname cnt1
#
telnet server enable
#
interface GigabitEthernet1/0/1
ip address 192.168.1.251 255.255.255.0
#
line vty 0 63
authentication-mode none
#
switchto context cnt2
#
sysname cnt2
#
telnet server enable
#
interface GigabitEthernet1/0/2
ip address 192.168.2.251 255.255.255.0
#
line vty 0 63
authentication-mode none
#
switchto context cnt3
#
sysname cnt3
#
telnet server enable
#
interface GigabitEthernet1/0/3
ip address 192.168.3.251 255.255.255.0
#
line vty 0 63
authentication-mode none
#
- 2025-03-13回答
- 評論(0)
- 舉報
-
(0)
暫無評論


編輯答案


親~登錄後才可以操作哦!
確定你的郵箱還未認證,請認證郵箱或綁定手機後進行當前操作
舉報
×
侵犯我的權益
×
侵犯了我企業的權益
×
- 1. 您舉報的內容是什麼?(請在郵件中列出您舉報的內容和鏈接地址)
- 2. 您是誰?(身份證明材料,可以是身份證或護照等證件)
- 3. 是哪家企業?(營業執照,單位登記證明等證件)
- 4. 您與該企業的關係是?(您是企業法人或被授權人,需提供企業委托授權書)
抄襲了我的內容
×
原文鏈接或出處
誹謗我
×
- 1. 您舉報的內容以及侵犯了您什麼權益?(請在郵件中列出您舉報的內容、鏈接地址,並給出簡短的說明)
- 2. 您是誰?(身份證明材料,可以是身份證或護照等證件)
對根叔社區有害的內容
×
不規範轉載
×
舉報說明
暫無評論